
Mercury Filling Removal: My Experience

Hello dear friends!
For those of you who follow me on social media (hey, if you haven’t yet, come on over. I promise I won’t bite!), you probably already know that last week, I got some dental work done. After finally finding a good holistic dentist (more on them later), I discovered that I had an old silver/mercury filling in one of my upper teeth that was leaking, and had additional decay surrounding it. (Scroll down for pics) Yikes! Needless to say, that revelation wasn’t one I was expecting, but this was something that needed taking care of, and soon.
I had completed a round of heavy metal detox several months ago, but honestly had no idea that I was still dealing with a leaking mercury filling in my mouth. While I certainly felt better after the detox period, it wasn’t as great of a positive change as I would have hoped, and now I think I know why. Obviously, my body wasn’t able to keep up, with the continuous flow of toxins from that nasty tooth. But hey, now it’s totally taken care of, and I am on the mend.
I get a lot of questions from clients and friends about heavy metals, but particularly mercury fillings. There is a lot of misinformation out there on the dangers of mercury and conventional dentistry in general. And while it’s my opinion that mercury fillings should definitely be removed, there is a right way and a wrong way to do it! Especially for any of us that deal with chronic health issues, or are otherwise “high risk,” it’s critical that filling removal is approached with extreme caution. A lot of this comes from the dentist’s end, but also your own preparation and self-care.
So, I wanted to share all about my own experience, and give you some tips on how to safely go through the process of mercury filling removal! Ready? Let’s dig in.
The first place to start is by finding a holistic dental provider. Thankfully, I was given a great recommendation by a friend (thanks, Lindsay!) and after checking out their website, I felt comfortable making an appointment. Keep in mind, whether you have insurance or not, holistic dentistry may cost a bit more than conventional dentistry. But trust me, it’s worth it in the end, especially when considering the potential hazards of mercury filling removal!
Here are a few things to look for in your new dentist:
- 100% mercury-free and fluoride-free office/clinic
- Adherence to International Academy of Oral Medicine and Toxicology’s (IAOMT) protocols
- Experience with safe removal of mercury fillings
- Safety precautions such as: staff wearing full respirators, in-office air filtration, chair-side air purification, supplemental oxygen, eye protection/glasses, and skin barriers
- On-site detoxification support during/after procedure
- BPA, latex, and gluten-free tools
- Friendly, supportive environment (duh!- nobody likes going to the dentist. Let’s make it as comfortable as possible!)
A few words about my new dental office, Studio Z Dental: These guys truly are amazing. The office was spotless, the staff was friendly, and I felt completely taken care of. I met with Dr. Tom Zyvoloski, who took the time to get lots of images of my mouth, do a complete exam, and make recommendations for treatment. I always like when healthcare providers have a good mix of kindness and competence, and he was spot on.
Because of a bad filling repair experience last year, I was quite hesitant to move forward, but after seeing the pictures, I knew it was a must. The procedure itself was certainly tiring, but Dr. Z and his team made me feel as comfortable as possible. I paid close attention to their protocols (former lab scientist, what can I say?), and everything was ultra clean and ultra safe. I’d recommend them with no reservations! Psst- if you do go to Studio Z Dental, tell them I sent you!
After my initial appointment with Dr. Z, I was more than ready to get this nasty filling outta my mouth. But I knew I had some work to do first. I made the appointment about two weeks out, to give myself the optimal amount of time to prep and detox.
Many of you have asked for my full mercury filling removal protocol, so I’m going to outline it all based upon a timeline. If you have any questions, don’t hesitate to ask. One of my health coaching specialties is detoxification, and I’m happy to help!
A quick caution about mercury filling removal: In order to reduce your body burden and reduce the likelihood of a relapse/flare-up after the procedure, it’s important to have only ONE filling removed at a time. If you have several, space these out by at least a month or two.
So, let’s walk through what you should do, to give yourself the best possible outcome for your filling removal. This is exactly what I did, and I feel great!
Two weeks ahead of time:
Now’s your chance to boost your inherent detox pathways, and also cut off any further toxic exposures.
- Each morning, on an empty stomach, drink a full glass of fresh filtered water with juice of ½ a lemon squeezed in it
- Take an herbal liver cleanse support formula, as directed on the bottle. I use this one
- Pick one of the following detox methods to do 2x/week before your procedure: coffee enema, infrared sauna, fresh green veggie juice
- Reduce toxic exposures as much as possible.
The day before:
Now’s the time to really ramp up metal-specific detox methods, and prep your body.
- Drink the usual lemon water and continue taking your liver support supplements
- Make the heavy metal detox smoothie (from Medical Medium) OR take cilantro extract and chlorella 3x/day. You can also use Sealantro (this is a combo detox supplement).
- Go to bed a bit earlier than usual, and get as much sleep as possible
The morning of:
It’s GO TIME!
- Drink the lemon water and take your liver supplements as usual
- Make the detox smoothie for breakfast or take the cilantro/chlorella combo
One hour before your procedure:
- Take another dose of cilantro/chlorella, along with a capsule of activated charcoal (my dentist gave me this in-office, but you may have to provide your own)
Immediately following your procedure:
- Take another dose of cilantro/chlorella.
- Rinse your mouth out with an activated charcoal solution (I was given this in-office, but you can also do this at home):
- Mix approximately 1 tsp of activated charcoal with 8 oz fresh filtered water
- Take small sips and swish each gently in the mouth
- Spit out in the sink or toilet (DON’T swallow!)
- Drink extra water the rest of the day/evening
- Before bed that night, take another dose of cilantro/chlorella.
The day after:
- Start with the fresh lemon water, as usual, and the liver supplement
- Make the heavy metal detox smoothie
- Do a coffee enema or infrared sauna (I did both)
- Take the cilantro/chlorella 3x/day
- If you feel any adverse effects so far, take another activated charcoal capsule and/or bentonite clay
The week after:
- Drink lemon water every morning, and continue liver cleanse for at least 3 days after the procedure
- Make the heavy metal detox smoothie each morning and/or take cilantro/chlorella 3x/day
- Increase your self-care! This means more sleep, more meditation/yoga, and more downtime overall.
- Manage your pain and call your dentist right away if anything seems out of the ordinary. Expect to be a bit sore, and have some cold sensitivity, but any more than that, and you should get in touch with your dental office!
Of course, having dental work done, even if you’ve had great experiences with dentists in the past, is still a form of trauma. So, give yourself extra love and care for the weeks afterwards. Get a massage and/or energy work. Journal. Take an epsom salt bath. Cuddle with your dog. Whatever helps you feel grounded in your body again.
If you feel like you’re still under the weather/experiencing flare-up symptoms more than one week after your filling removal, you can certainly continue the heavy metal detox smoothies and/or the cilantro/chlorella supplements. Every body is different, and you may have a larger metal burden to clear out! Some people require 2-3 months of detox, so be patient with yourself.
I’m sitting at exactly one week out right now, and I feel pretty good overall. My mouth is a tad sore, but I expected that, given how deep that filling went. But I am so SO grateful to have that out of my system, and have taken another step towards health!
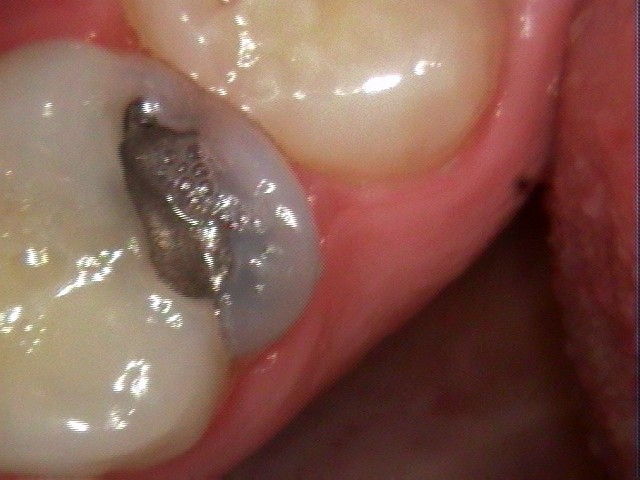
Before- look at that discoloration- yikes!

Before- you can really see the leakage/decay here

After- so much better!
Okay, friends. I know that was a LOT to digest. Again, I’m here to answer your questions or coach you through your own mercury filling removal, so don’t hesitate to reach out.
Have you had any mercury fillings removed? Tell me about your experiences in the comments below!
And as always, my lovelies…
~ Hoping you feel as well as possible ~

** This post contains affiliate links, which help me support my blogging. You can read more about them here. **